My first foray into sourdough bread-making was as a teenager. I nurtured a starter from its humble beginnings as a shapeless blob of flour and water into an amazing loaf of sourdough. Then, when my second batch didn’t turn out as well, I abandoned it. I wasn’t up for the trial and error that is bread-making.
Fast forward to spring 2020 when the world came to grips with “2 weeks to flatten the curve” and my favorite bakery closed down, we were left high and dry without our organic whole grain sourdough we had loved so much.
At the time, my older kiddo was in a PB&J phase, so going without bread (which is not a big deal to me personally), was clearly unacceptable.
Thus began my re-introduction to sourdough bread baking. Although most pandemic sourdough makers ultimately decided the fuss wasn’t worth it (hey, I get it), I’ve come to enjoy the ritual of making sourdough.
Many of you have seen examples of my sourdough loaves shared on Instagram and have asked for the recipe.
I’ve hesitated many times about sharing my sourdough method. Why I’m resistant to sharing my sourdough bread method:
- For one, I’m not an expert baker. I make no claims to have figured out all the “ins and outs” of bread making. There are hundreds (probably thousands) of books devoted to the topic and countless forums online with both master and frustrated bakers sharing their successes and failures. There are a lot of contingencies with anything that’s naturally fermented.
- I’m not great at following recipes. Unlike most bread makers, I don’t own or use a food scale, so there’s naturally going to be variability in each batch. I kind of like that, but if you’re a perfectionist, my method might bother you and you may want to find one that gives ingredients in gram amounts and more precise instructions. No hard feelings.
- Bread takes time. I try to focus on non-fussy recipes that you can put together in 30 minutes or so. Traditionally fermented sourdough bread is not that. For many (including myself up until the past 18 months), it was far easier to just buy good quality sourdough from a small baker. We still do on occasion, actually.
- Grains are an optional food. You can have a perfectly balanced, nutritionally complete diet without grains. I try to highlight recipes/ingredients that provide the most nutritional bang for your buck (liver pate anyone?). That said, grains are delicious and can be made more nutritious (and less of a strain on your blood sugar) when prepared via traditional sourdough fermentation.
So here we are… I guess I have to share my sourdough recipe…
Is Sourdough Healthy? What Does the Research Say?
Phytate & Mineral Absorption from Sourdough Bread
One of the major benefits of sourdough fermentation is reduction in compounds known as phytate (also called phytic acid). Phytate is naturally present in whole grains and binds minerals (especially calcium, magnesium, iron, copper, and zinc), preventing their absorption. I talk about phytic acid more in this post about nuts.
The sourdough fermentation process involves yeasts and lactic acid bacteria which reduces the pH of the dough (makes it more acidic) and activates native phytase enzymes, both of which leads to a 70-90% reduction in phytate levels. This increases bioavailability of all of the above-mentioned minerals.
In contrast, non-sourdough yeast-fermented bread results in only a 38% reduction in phytate.
Gluten Content of Sourdough Bread
Gluten is a protein found in certain grains, such as wheat, rye, and barley. Many find that it is difficult to digest. Some people have an adverse reaction to gluten beyond digestive distress, such as flare ups in autoimmune conditions. Others have full blown celiac disease, where they cannot tolerate even the tiniest amount of gluten without suffering severe damage to their intestines and a slew of other health issues.
While I recommend people with celiac disease NOT to consume my sourdough bread, those with mild gluten sensitivity or gluten intolerance (such as non-celiac gluten sensitivity) may be able to tolerate properly fermented sourdough. Here’s why.
The sourdough fermentation process activates specific proteases (protein-digesting enzymes) that break down gluten. For example, in one study, gluten content of dough decreased 20-fold after sourdough fermentation. In another study, a 72 hour fermentation of wheat with sourdough cultures resulted in gluten concentrations less than 20 ppm, which meets the labeling criteria for being gluten-free.
As an anecdote, I generally choose not to consume much gluten because I find it challenging to digest. However, I’ve found that by using 1) organically grown wheat flour and 2) long fermentation times with my sourdough, I have absolutely NO digestive problems from this bread. Is it because of the decrease in gluten or something else? Who knows. But it works and it’s lovely to have the option of eating bread again.
Glycemic Index of Sourdough Bread
Traditionally fermented sourdough bread doesn’t impact your blood sugar as much as regular bread. In other words, it has a lower glycemic index.
There are several reasons for this:
- Starches are “eaten” by the bacteria and yeast during fermentation (meaning the resulting sourdough bread is lower carb).
- Acids produced during fermentation have physiological benefits. Lactic acid lowers the rate of starch digestion. Acetic and propionic acid delay gastric emptying.
- Fermentation changes what’s called “starch gelatinization,” which slows the process of breaking apart individual sugars.
- Amino acids produced during fermentation accumulate in sourdough bread, some of which may help regulate glucose metabolism.
- Phenolic compounds increase from fermentation, which may lower the glycemic index.
This is all awesome, but keep in mind that sourdough bread is still bread and still contains carbs, so it will raise the blood sugar to some degree, just not nearly as much as regular bread. I always pair my sourdough with fat/protein to further reduce the glycemic load (#nonakedcarbs is term I coined very early in my career as a dietitian and it’s still a practice I follow and recommend). My CGM experiments (with a continuous glucose monitor) show that sourdough in the context of a meal/snack with sufficient protein and fat does not spike my blood sugar. You’ll need to experiment yourself to see if and how much sourdough impacts your blood sugar. We’re all different!
Gut Health, Probiotics, and Prebiotics in Sourdough Bread
Upwards of 50 different species of lactic acid bacteria have been isolated from sourdough. While much of the probiotic bacteria are inactivated during baking, some survive. And even if some probiotics don’t survive baking, they leave behind beneficial “prebiotics” that further nourish our own microbiomes (in case these terms are new to you, a prebiotic is food for the probiotic bacteria in our gut.)
The microorganisms that are active in sourdough fermentation produce what’s called “exopolysaccharides” or EPS, which are specific types of carbohydrates (often serving as “prebiotics”) that offer gut health benefits. This includes glucan, fructans, dextran, propionic acid, and gluco- and fructo-oligosaccharides, which have been “postulated to have several beneficial effects, such as reduced cholesterol and triglyceride levels, and increased insulin sensitivity.”
Higher B-Vitamin Levels in Sourdough Bread
Many B vitamins are heat-sensitive, and therefore decrease in concentration when bread is baked. Sourdough fermentation has been shown to increase the levels of certain B vitamins — including vitamin B1 (thiamin) and B2 (riboflavin) — and better preserve the levels of these vitamins in the final bread after baking. One research paper points out that “long fermentations could favour a net synthesis of thiamine by yeast, which could compensate for losses during cooking.”
Keep in mind that longer fermentation times are required to give the yeasts enough time to work their magic. Researchers note: “Highest levels of B vitamins were achieved by long yeast fermentations.” This is why it’s important, if you’re buying sourdough at the store, whether the baker used a “cheater method”, such as combining a bit of sourdough starter with yeast for a quick rise but sour-tasting bread OR simply added acids to a standard yeast bread to give it a sour flavor.
This is why it’s important to ensure your sourdough is truly traditionally fermented if you’re purchasing sourdough (ingredients should just be flour, water, and salt; some will also list “sourdough starter”). If you see yeast on the ingredient list, it’s not a traditionally fermented sourdough.
How to Make Sourdough: Taking the Fuss Out of Sourdough Bread
Although I like to cook, I do not like fussy recipes. I’m also a notorious rule-breaker in the kitchen, so over the last 18+ months, I’ve broken probably every sourdough rule in the book, and yet every loaf I’ve made has still been edible.
Some loaves rise more than others. Some have big billowy holes in them and others have a dense grain. Some brown more than others. It’s par for the course when you don’t use a food scale, play around with different flours, fermentation times, and so on. Also, factors outside of your control, like the humidity and air temperature (or kids interrupting you and throwing off your timeline) can impact your final loaf.
The following method that I’m sharing here is the baseline recipe that has been my standby.
I personally make a recipe that yields 2 loaves. Twice the bread for the same effort. And I only have to bake once a week or once every other week (remember, I’m lazy in the kitchen). That means I keep my starter in the refrigerator between batches and factor in extra time to re-enliven the starter prior to starting the next loaves.
I also prefer a longer, cold fermentation for my sourdough, which gives me more wiggle room in the baking time (I don’t have to be in and out of the kitchen at specified times ALL DAY LONG) and it gives the bread a more pronounced sourdough flavor.
That said, if you WILL be in the kitchen all day and don’t mind a less sour flavor, you can do this recipe in a shorter time period. Just don’t skip the first overnight bulk ferment. That’s key to the best sourdough flavor.
Best Flour for Lily’s Sourdough Bread
Before I cover my method for sourdough, let’s talk flours.
Technically, you can make sourdough with any flour you like. I’ve played around with close to a dozen options, from einkorn to spelt to bread flour to all-purpose flour to whole wheat flour and more.
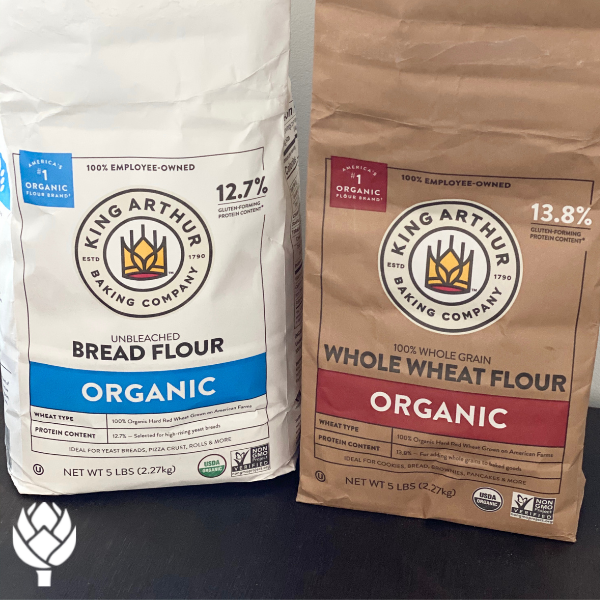
What I’ve settled on is mostly organic whole wheat flour (I prefer the nutritional profile of whole grains), but includes some organic bread flour (which provides a lighter texture). Organic is important to me because organic practices prohibit the use of glyphosate-containing pesticides (or the use of glyphosate as a harvesting aid to “dessicate” the wheat). Conventionally grown wheat is almost always contaminated with glyphosate residues, so this is one way I can minimize exposure. I’ve covered the many problems with glyphosate in Ch 10 of Real Food for Pregnancy.
Generally speaking, whole grain flours absorb more water, so if instead of using my recipe, you opt for more bread flour, you may need less water. If you do a 100% whole grain loaf, you’ll need more water.
King Arthur Flour is the brand readily available to me (no, I have no financial ties to them). Unlike some flours I’ve tried from local mills, the grind is very fine, which results in a fluffier loaf. I also like that their flours are unbleached (no chlorine residues in the flour), unbrominated (bromine is highly toxic to the thyroid), and un-fortified (I know enriched sounds good in theory, but I try my best to avoid synthetic folic acid, as covered in my very detailed post on folate).
Lily’s Sourdough Bread Method
My recipe is loosely based on King Arthur Flour’s recipe for Naturally Leavened Sourdough, however I’ve made quite a few adjustments, including increasing the whole wheat flour from a mere ¾ cup to 4 cups. I also do most steps of my sourdough method directly in the mixing bowl so I don’t make a huge mess of my counter & significantly extend the fermentation time (including a long bulk fermentation in the refrigerator) for a more pronounced sour flavor and lower gluten content.
You’ll need a sourdough starter. If you’re starting from scratch, like I did at the beginning of the pandemic, I made my own via this method. It will take about a week. If in doubt, keep feeding it. My only recommendation for making starter is to cut the proportions down significantly so you have less waste (i.e. start with 1/4 of the amount of flour and water suggested in the King Arthur Starter recipe). I set aside the discard in the refrigerator and used it in other recipes, like pancakes. I just can’t handle any food waste.
Recipe:
2 cups “fed” or “ripe” sourdough starter (as measured when stirred down)
2 cups water (if the dough is too stiff, you can add an extra 1/2 cup for 2 1/2 cups of water total)
4 cups whole wheat flour
2 cups bread flour
1 tablespoons fine sea salt* (yes, the “big” spoon; 1 tablespoon is equivalent to 3 teaspoons)
Cheatsheet:
Day 1: Restart the starter, make the dough, cold bulk ferment begins
Day 2: Knead, stretch, continue cold bulk ferment, shape & cold rise
Day 3: Final rise, bake
*My preferred unrefined salt is Redmond’s Real Salt Use code LILY to save 15% on your order (affiliate code).
Lily’s Sourdough Bread: Full Instructions
Day 1: Restart the starter, make the dough, bulk ferment begins
Restart the starter (morning of Day 1)
I keep my starter in the refrigerator between batches of sourdough because I don’t bake that often, I don’t want to be a slave to keeping my starter alive, and I prefer a zero waste approach to baking. If you keep the starter on your counter, you’ll need to either find a use for all the excess starter or throw away a lot of it before each feed. Again, this is why I keep mine “dormant” in the fridge.
I keep about ½ to ¾ cup of starter in a 24 oz mason jar in the refrigerator, lightly covered (plastic bag and a rubber band around it works).
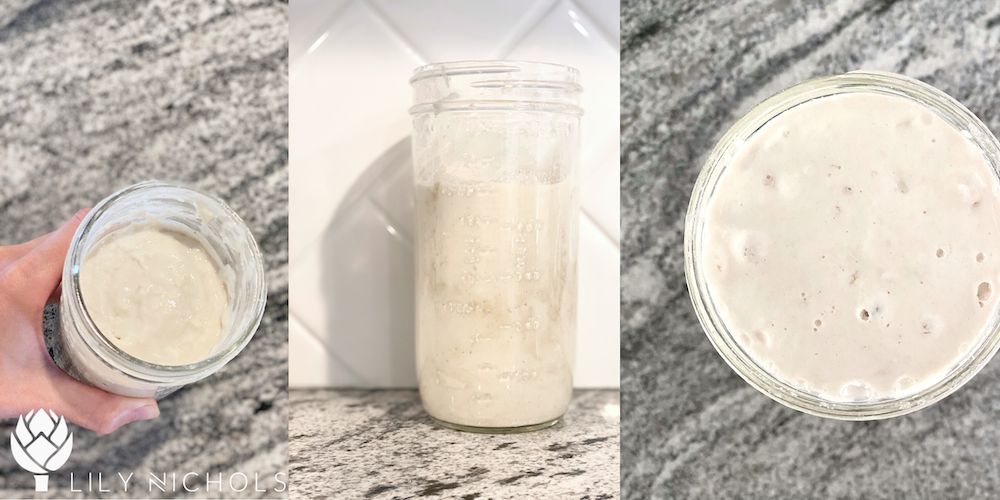
When it’s time for a new loaf, I allow about 8-12 hours to “restart my starter” with a feeding of flour and water before I begin the new loaf.
Simply add about 1.5 cups of bread flour + 1 cup of water to the starter jar. Stir to combine. This should bring the level of starter up to the 2 cup mark on the mason jar. Cover, and let sit for 8-12 hours or until bubbly and the contents have reached the top of the jar. Keep in mind it may overflow the jar (especially if your house is warm!), so you may do this in a large bowl (instead of the jar) or set the jar on a plate in case any spills over. Times may vary if your house is unusually hot or cold.
You can test to see if your starter is ready by filling a glass with water and dropping a tablespoon of starter into it. If the blob of starter floats, you’re ready to bake. If it sinks, give it some extra time (or possibly another small feed) and check on it again in a few hours.
Make the dough & begin the bulk ferment (evening of Day 1)
When your starter is bubbly and ready (bakers call this “fed”), stir it down and measure out ~2 cups of starter into a very large mixing bowl. (If you use the 24 oz jar method outlined above, you’ll end up with 2.5 cups of fed starter. I simply leave the ½ cup of starter in the starter jar and return it to the refrigerator at this point, lightly covered with a plastic bag or beeswax wrap to allow any gas bubbles to escape.)
Add your flour and water (but not the salt yet!) to the bowl. With a sturdy wooden spoon (or clean hands), mix and knead the mixture until it forms a shaggy ball of dough. It won’t look pretty. That’s ok! Just ensure all the flour is incorporated into the dough.
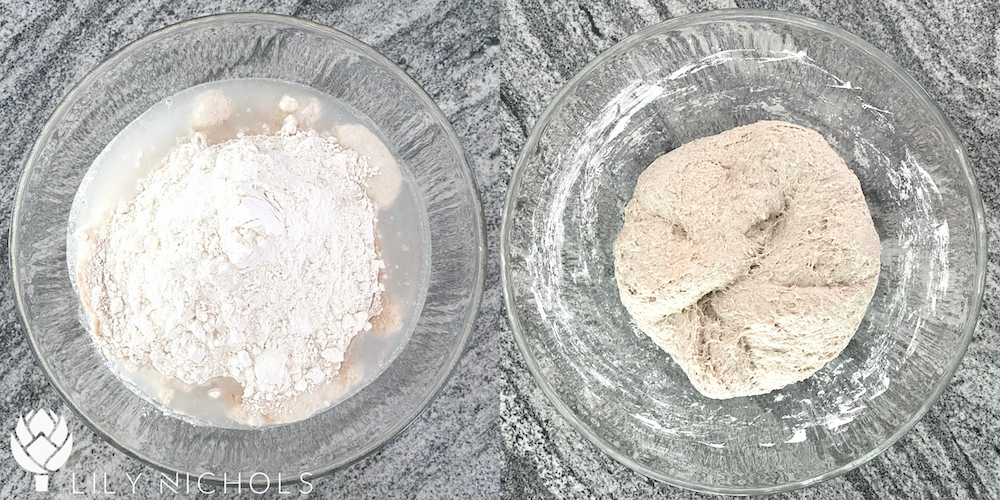
Cover with a damp tea towel and let sit for about 30-60 minutes. This step is called “autolyse” and it helps the dough become easier to work with and will result in a better rise later on.
After autolyse, sprinkle the salt on top of the dough and use a “stretch and fold” motion (folding it like a business letter) to incorporate the salt into the dough. Knead for a few minutes (I do this directly in my large bowl so I don’t make a mess of the kitchen) and cover for 30-60 minutes.

Stretch and fold the dough once more* and turn the dough seam-side-down into the bowl, shape into a ball by tucking under the ends, and cover with a beeswax wrap or plastic wrap, and place in the refrigerator overnight.
*You can repeat the stretch/fold a few more times if time permits.
Day 2: Knead, stretch, continue bulk ferment, shape
Knead/stretch (morning of Day 2)
In the morning, remove the bowl from the refrigerator and let it sit on the counter for about 30-60 minutes (this makes the dough easier to work with).
Then, stretch and fold the dough, once again tucking in the edges of the dough to form a smooth ball (again, I do all of this in the bowl to avoid dirtying my countertop, but you do you!). Cover and return to the refrigerator to continue the bulk ferment.
Shape (evening of Day 2)
Remove the dough from the refrigerator and use a sharp knife to divide the dough into two. On a clean countertop, fold the edges of the dough into itself, like a business letter. Flip the dough seam-side-down and shape the halves into two rounds using the outer edges of your hands to “tuck under” the edges dough to form a firm ball.

Cover with a damp tea towel and let rest on the counter for 20 minutes.
After this short rest, reshape the balls of dough (gently “tuck under” the edges). Now, it’s time to transfer to your banneton or loaf pan to rise.
If you are making a free-form loaf in a banneton or bowl, dust lightly with flour and use your hands to evenly distribute the flour on top of the dough. Transfer the dough to a bowl (or banneton) lined with floured cloth with the dough seam-side-up. Dusting the dough with flour prevents it form sticking to the cloth (I’ve forgotten this step in the past and paid the price with quite a mess!).
If you are making bread in a loaf pan, there’s no need to flour the dough. Simply transfer to a greased loaf pan (I use coconut oil) with the dough seam-side-down.
I usually do one of each: one as a free-form loaf shaped in a banneton and the other in a loaf pan for sandwiches.
Cover the dough with a doubled-over, damp tea towel and place in the refrigerator overnight. (Alternatively, you could let these rise at room temperature for 2-4 hours and bake this evening.)
Day 3: Final rise & bake
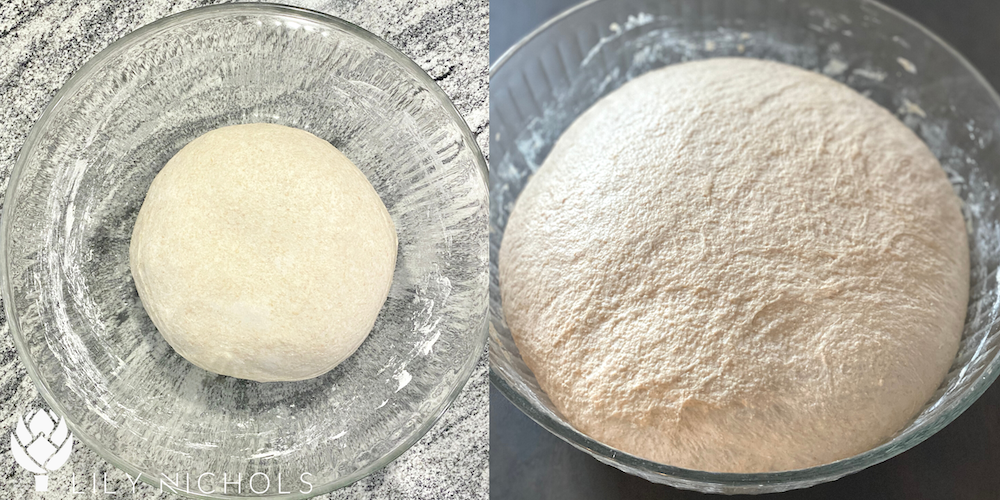
In the morning, remove the rising bread from the refrigerator. If your loaves have not risen sufficiently overnight, let sit on the counter, covered, until they have risen enough. This may take several hours. You want the dough to be above the edges of your loaf pan or banneton.
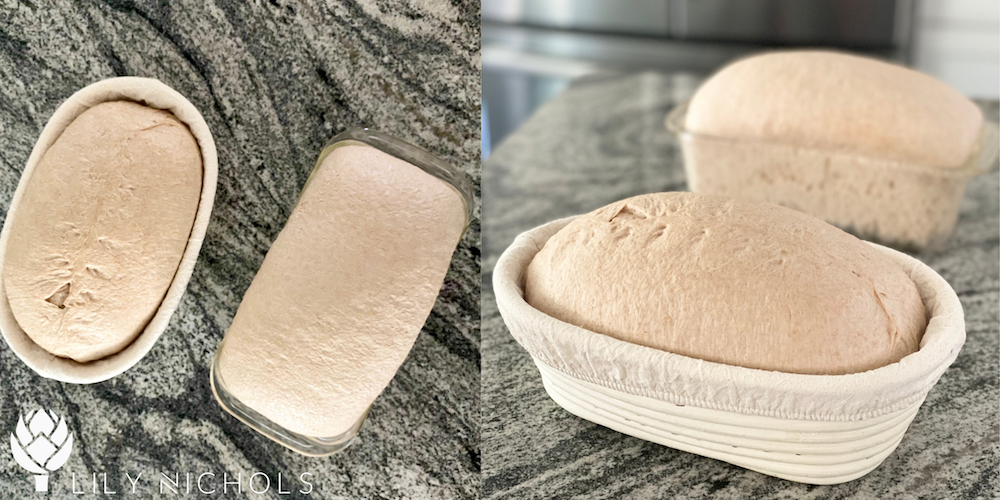
Preheat oven to 450 degrees F.
If baking in a loaf pan, score the top of the loaf with a knife or razor blade (a few large slashes is fine) and bake on a lower rack.
If your bread has risen in a bowl or banneton, you’ll need to transfer the bread to a baking sheet. Simply line a cookie sheet with parchment paper and gently invert the bowl/banneton. Use a razor blade or sharp knife to score the bread and bake.

I bake two loaves side by side on the lower rack of my oven for 15 minutes. Then I rotate the pans 180 degrees and return to the oven for ~10 more minutes.
Voila!
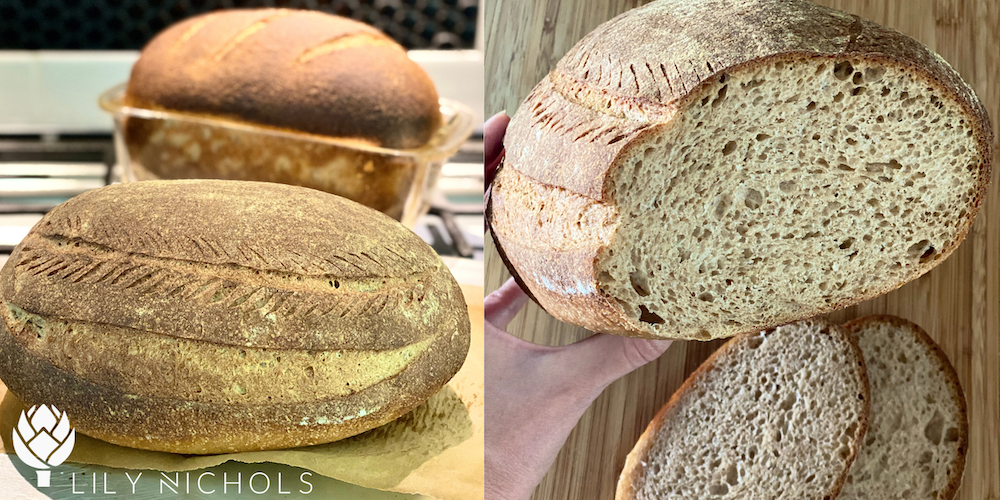
As hard as it is, let the loaves cool to room temperature before slicing. This is important to lock in the moisture into the bread.
Once the bread is fully cooled, I wrap in a plastic bag and keep it in the refrigerator. We don’t eat a LOT of bread in our house (about 1 loaf per week unless the kids are really into bread at that moment in time), so keeping it in the fridge ensures that it doesn’t go moldy before we eat it all.
This all sounds like a ton of work when I write it out, but you’ll develop a rhythm after a few rounds of baking. Pretty soon you won’t even need my instructions!
Happy Sourdough Baking!
Lily
PS — Before you go, I’d love to hear from you. Have you ever baked homemade sourdough? If so, was the method similar to mine? How did your bread come out? Any tips for novice sourdough bakers?
References
- Leenhardt, Fanny, et al. “Moderate decrease of pH by sourdough fermentation is sufficient to reduce phytate content of whole wheat flour through endogenous phytase activity.” Journal of agricultural and food chemistry 53.1 (2005): 98-102.
- Lopez, H. W., et al. “Prolonged fermentation of whole wheat sourdough reduces phytate level and increases soluble magnesium.” Journal of Agricultural and Food Chemistry 49.5 (2001): 2657-2662.
- Thiele, Claudia, Simone Grassl, and Michael Gänzle. “Gluten hydrolysis and depolymerization during sourdough fermentation.” Journal of Agricultural and Food Chemistry 52.5 (2004): 1307-1314.
- Loponen, Jussi, et al. “Degradation of HMW glutenins during wheat sourdough fermentations.” Cereal Chemistry 81.1 (2004): 87-93.
- Poutanen, Kaisa, Laura Flander, and Kati Katina. “Sourdough and cereal fermentation in a nutritional perspective.” Food microbiology 26.7 (2009): 693-699.
- De Angelis, Maria, et al. “Mechanism of degradation of immunogenic gluten epitopes from Triticum turgidum L. var. durum by sourdough lactobacilli and fungal proteases.” Applied and Environmental Microbiology 76.2 (2010): 508-518.
- Gänzle, Michael G., Jussi Loponen, and Marco Gobbetti. “Proteolysis in sourdough fermentations: mechanisms and potential for improved bread quality.” Trends in food science & technology 19.10 (2008): 513-521.
- Batifoulier, Frederique, et al. “Effect of different breadmaking methods on thiamine, riboflavin and pyridoxine contents of wheat bread.” Journal of Cereal Science 42.1 (2005): 101-108.





Here’s what I do. It’s not artisan, but it usually rises well, the kids like it and use it every day for sandwiches. It’s easy and fits into our schedule.
Around 4pm (my son does this when he gets home from school)
Mix up 4 cups whole wheat flour with 375 grams of water. Cover and let sit (the autolyse period – I find whole wheat flour benefits from a long autolyse)
Take starter out of the fridge, feed it, let sit for about 4 hours.
Around 8 or 9 pm
Add 10 g salt to dough, knead it in a bit, then add 125 grams of starter (if it’s warm in your house, use less starter). Stretch and fold the dough to incorporate starter. Cover bowl with saran wrap, set timer for 15 minutes, then come back and do another 8 stretch and folds. Do 3-4 sets of stretch and folds, separated by 20 minutes.
We keep our starter in the fridge, and let it sit out for about 4 hours after we feed it, then it goes back in the fridge. We make bread every 3 days. This routine seems to keep the starter working well.
Overnight – Leave covered on counter overnight for bulk fermentation.
Morning – stretch and fold a few times, even pick it up and roll the dough into itself so you end up with a round outside. Place seam-side down in loaf pan.
Rise & bake.
Set in breadmaker for a bake-only cycle of about 90 minutes. Set delay timer for 4 hours. Nobody is home when it bakes, and so we just let it cool off after in the bread maker.
Then we all come home to a fresh loaf of bread.
Thanks for sharing your method!
Can you share the serving size and protein for this recipe?
It’s MUCH easier than it sounds. And my bread tastes so much better than any bakery. I just have to wait for a moment of inspiration… like when my toddler goes to bed, I can whip up some dough while sipping a glass of wine. I like Emilie Raffa’s book Artisan Sourdough Made Simple!
Yes, it’s way easier than it sounds. Kind of pains me that the instructions are so long, but once you get the hang of it, it’s pretty simple.
Hi Lily! These tips are so helpful and much more clear and precise than other “easy sourdough” recipes so thank you! How would you adjust your recipe for baking in a dutch oven?
Simply make the bread dough as I have it laid out, then bake in the dutch oven lined with parchment paper. Search for other sourdough recipes that use that method for the specifics on temp, time and when to remove the lid. It’s been a while since I baked that way. As I said in another comment, I’ve used that method, but can only bake one loaf at a time, so I just do it on an open sheet pan (and one in the bread pan) now.
Thank you so much for this gift of a blog post! I’m moving towards your real food diet, for current breastfeeding, and for preconception and future pregnancy. My one sadness in going lower carb was cutting out sourdough. I love sourdough baking and am keen to try your recipe! I usually bake my loaf half way through in a lidded cast iron in a hot oven. Sadly we don’t get King Arthur flours here, but their sourdough recipes are great 🙂
I’ve done it that way, too. My reason for ditching the dutch oven method is I only have one dutch oven and even if I had two, I can only fit one in the oven at a time. I want to bake both loaves at the same time and not waste all that fuel (or overheat my house if it’s in the summer months). That said, this recipe works great with the dutch oven method! Take your pick.
Thank you, thank you, thank you!! I love your thorough, research backed posts and have been hoping to get my hands on your recipe for so long!! Can’t wait to try it
Report back!
It’s so interesting to see how much sourdough recipes vary! I started trying homemade sourdough a few months before coronatide because I wanted to find a healthier way to eat bread. I swear by the recipes and advice on theperfectloaf.com, but tbh I haven’t done a lot of experimenting. A couple of differences I noticed in your recipe: I use far less starter, and I shape my loaves before they have any time in the fridge. I usually do leave my shaped loaves to ferment for 18-36+ hours. I’ve got photos of mine on the gram at @katiecookseverything, but it’s been a bit since I’ve posted there.
I use white whole wheat flour, oat flour, and a bit of all purpose flour in my whole grain bread. Using a stand mixer really helps me keep the mess to a minimum. I usually don’t do a long ferment in the refrigerator, but I’d like to try especially if there are health benefits to that method. My advice to new bakers would be to find a bread recipe that works well for them whatever kind it may be (boule, sandwich, French, etc). Once you have lots of experience with one recipe, it is easier to experiment with and troubleshoot a new recipe!
Thank you for this! I love King Arthur’s Simple Sourdough bread recipe too… the directions are so easy!! If I use starter that isn’t just fed (just came out of the fridge), does it make a difference to the gluten content or anything? I sometimes do it with unfed starter and the bread turns out fine, but I’m wondering if maybe it changes the “healthiness” or anything? XD
I will definitely switch from 2 days to 3. I’m allergic to gluten, but I can take homemade sour dough a few times. One thing I do different is when it comes time to bake I hear up oven to 475 with dutch oven in it. It’s VERY HOT! Then I drop one loaf inside with 45° slit, close the lid, bake for 20-25 minutes, then open the lid and finish backing. It gives an amazing crust.
Thank You for your article.
I find that I tolerate einkorn really well, but not so much other varieties of wheat. Did you experiment with whole wheat einkorn in your sourdough making, and if so, how did this change your process?
Thank you, I haven’t yet attempted sourdough or any (non-quick/veggie/fruit) bread.
I find it intimidating.
I am curious to hear how the einkorn turned out, as I don’t notice gluten sensitivity with einkorn. Products, but it seems like a heavy flavor for bread.
I personally have history of pco so limiting grains works well for me. However, I have this dream of being a woman who can make bread—-and my husband and kids love bread.
So excited to try this recipe! For the last year and a half I’ve been using a recipe from the New York Times that is a similar 3 day process but much more labor intensive and baked in my Dutch oven (and 70-30 bread flour to whole wheat ratio). Looking forward to a healthier version… and to not having to knead dough for 20 min straight and then every hour for 4-7 hours after that ☺️☺️
Oh boy, that much kneading is way too labor intensive for me. I’d never make bread if it was that much fuss! Hope you enjoy this recipe, Melissa!
I’m about to put my sixth loaf in and I haven’t had any loaf rise successfully yet. This time I used even more starter and warm water to initially mix together (the others I followed instructions exactly.)
I’m using einkorn flour, 4 cups whole wheat and 2 cups all purpose (or half when I make one loaf at a time). It’s a good consistentcy and I’m able to knead it and shape it but it only rises halfway. I’ve done the starter test each time and only begin when the glob of starter floats.
Would love any tips! Kids still like bread but I would love for it to rise!
I used to use einkorn flour, but it didn’t have enough gluten to support a solid rise. This is why I eventually switched to regular organic whole wheat. Some people have luck with additional kneading and stretch/folds to give it more structure. You could try it in a loaf pan instead of a banneton/free form loaf, a longer rise time at room temp (especially immediately prior to baking and especially if your house is on the cooler side), or you could also play around with less water in the dough… But I eventually ditched einkorn for bread and instead use it for finer textured baked goods.
Hi Mrs. Nichols!
I just made this for the first time…. I am so happy to report it was a huge success and will now be a weekly staple in our kitchen!
I have flopped so many other sourdough recipes and was beginning to feel defeated, yours finally worked and my family approved.
Thank you so much!
Hooray! I’m so happy to hear that my sourdough method worked for you. 🙂
Hi Lily!
Thanks so much for this recipe. We have been gluten free since my baby has been born. Whenever I did try some wheat, it seemed to give her a tummy ache and cause more spit up. This is the only wheat we now consume (such a nice treat to have fresh bread again!) and she seems to do just fine with it! Yay 🙂
I’ve made your recipe several times now. I make a 100% whole grain loaf, so I’ve had to experiment with your recipe a little bit. I’ve gotten it to rise a lot better by adding some more water and kneading it a little more throughout the process. But, by the final rise, I just can’t get it to rise anymore… so the loaves don’t get quite as big as yours. Is this due to using all whole grain flour? Also by the time of the final rise, it has some tears on the top of the loaf (also not like your pictures above where the dough looks very smooth)…. is this from over kneading??
Any info you have would be so helpful! I keep experimenting, but haven’t been able to figure out those two issues yet.
Thanks so much!!
Brittany
So the 100% whole wheat/whole grain flour loaves I have made didn’t rise as nicely, which is why I compromise with the recipe here (using some bread flour, but mostly whole wheat). I think the issue is the need for more gluten and less fiber for it to rise appropriately. That said, if you’re set on only using 100% whole grain flour, try doing the rise in a bread pan and baking in the bread pan directly instead of the free form loaves that rise in a bowl/banneton. The sides of the pan will give you the necessary support for it to rise better.
Hi,
So it says 3 tbsp salt then underneath says 3 teaspoon. Wondering which it is.
Thank you!!!
One tablespoon (which is the equivalent of 3 teaspoons).
Hi Lily,
What type of flour do you use for your starter? In the link you provided I noticed they say to use white flour…do you use white flour, whole wheat, or bread flour for the starter? Or a combination?
I am so thankful for all of your recipes and content! I refer to Real Food for Pregnancy all the time even though my daughter is almost 2 now.
I am looking forward to making Sourdough a regular part of our diet!
I generally use organic all purpose flour for feeding the starter. If I’m out of that, bread flour.
Trying this for the first time! My dough got pretty stiff Any ideas what I could have done wrong?
Thanks!
Could be your starter wasn’t active enough or not enough water. I had this problem until I switched to a recipe from farmhouseonboone.com which was super sticky but actually ended up airy unlike the dense super hard crust bread I’d been getting from the King Arthur recipes I was trying. Have to try this one. I’d say add more water
Try using 2 1/2 cups of water instead of just 2 cups. Depending on the type of flour you’re using and even how you’re measuring the flour, you may need to adjust the ratios.
Oh Lily, you’ve done it. Made something that the rest of the internet worlds seems to make so complicated and high maintenance, and made it simple and doable! I should not be surprised – you come up with so many great methods of making it more simple to nourish ourselves and our families well. I’ve attempted sourdough several times in the last year and the results were either okay, or they were great but required WAY too much work to be sustainable in my life of being home full time with my four kids plus homeschooling. This is something I can. And I love that it’s a good portion whole wheat. My kids are slathering their slices with butter as we speak. Thank you!
So happy my sourdough method worked out for you, Maggie! I found sourdough to be too labor intensive and stressful when I first started (trying to get the timing JUUUUUST right) that I had to develop an easier method! The fridge rests and rises give you a lot more wiggle room in the timing.
Thank you for this! My starter is on day 5, not quite ready yet, and I’m reading through in prep to make bread! Do you (or does anyone) know if it’s possible to halve this recipe? I’m hesitant to make two loaves until I know they’ll turn out well. I know there can be trial and error at the start and I’d like to work through that process on a single loaf. Thanks!
You can absolutely halve the recipe!
Does anyone make this recipe with a kitchen scale? I prefer not to dirty measuring cups and just add everything to the bowl I’ve been looking for a whole grain recipe as a fellow dietitian and was happy to see this, along with the great article and references!
King Arthur flour has a conversion calculator on their web site. I’m sorry I don’t have the recipe in front of me right now!
Hi Lily! Thank you so much for this recipe. My daughter can eat bread again!
I was wondering about the Gluten content and how it relates to fermentation time and temperature. I assume less fermentation time means more gluten in the bread? And do you know if you can speed up the process by leaving it out on the counter?
Thanks!
Can you explain why you put in fridge overnight and again on 2nd day? Most other recipes I read it calls for out on counter. Just curious. Just starting your process and hoping to bake tonight 🙂 I love the minimal mess and no waste. So you pretty much have zero discard? I pulled my starter out of fridge, fed it and let it set. Then started in on recipe and put rest back in fridge.
Thank you for this wonderful post! I just made the bread tonight. I currently have my 1/2 cup of started in my fridge. When should I feed that next and how often do you feed your starter?
Thank you!
You can leave the 1/2 cup of starter in the refrigerator until you’re ready to make another batch of bread. Simply start at the top of the recipe with refeeding the starter.
Love the mixing bowl idea…Thinking about trying to bake bread again at home after my starter died. Approx how big is your mixing bowl?
I’m researching before I start my sourdough journey. I actually decided to try because I make yogurt and end up with a ton of whey. I read an article about replacing water in sourdough recipes with whey. I was wondering if you forsee any issues in trying this with your long ferment method?
This recipe/technique works great! Thank you for all this information! I have cooked and baked quite extensively, but never made bread before. I don’t eat a lot of carbs, but my husband and I do love bread, so I thought I’d rather be the one making it for the times that we do eat it. I really didn’t have high expectations for my first batch given how notoriously finicky bread is, but it looked and tasted like sourdough bread! It was delicious, and I have loved having a small piece everyday with lots of butter or cheese (honestly my favorite way to eat it is by itself because it’s so good, but I try to do no naked carbs!).
I just used this recipe to make my first ever loaf of sourdough and it turned out great! The dough was so tough when I did the folds, I thought it would be a brick, but it’s delicious! Denser than the white sourdough I buy in stores but still quite soft and the crust is perfectly chewy! The only change I made was baking it in a Dutch oven at 450 for 30 min and uncovered at 400 for 10 min.
Hey Lily, love your work thank you for everything!
I’m currently on my 3rd batch of your sourdough and loving it.
I can only bake one loaf at a time in my small oven and I prefer a smaller loaf for our little family so I’ve been doing 2 cups of flour for each loaf and just with this batch prepared 2 loaves and leaving the other in the fridge for a couple more days till ready to bake, I’m assuming it’ll be ok with an even longer ferment?
Also just to say that I live in South America and the ovens usually just have the heat coming up from the bottom which makes baking a little interesting… I hear the oven very hot in the preheat then turn it down to 180 C when the bread goes in and bake for about an hour
Thanks again for sharing, sending you and your family lots of love
Would it work to just to a 3-4 delayed second rise in the fridge covered without doing anything else?
Hi Lily!
Interesting/fun to learn your process. Thanks for sharing.
Long-time baker here… In my Sourdough journey, I also keep my starter in the fridge. When I plan to make loaves soon: to have ripe starter in 3-4 hours, I mix the starter by weight (in grams). Using a gram scale simplifies quantities and makes baking results repeatable. For same day bake, I mix starter using the 1 to 1 to 1 ratio method. for example: if the recipe calls for between 200 to 250 grams of starter, I’ll mix 100 grams of old starter, 100 grams of filtered water, and 100 grams of flour. I then mark the top of the mix in the jar with an outside rubber band. A vital/healthy starter will double in size in about 3 hours and become “ripe” (bubbly with rounded top) in about 4 hours. Also note- yeast (leavening) thrive at under 78 degrees and the LAB (acidity/tangy taste) thrive over 80 degrees. For ripe starter to be ready to mix dough in the morning, change the mix ratio to 1 to 2 to 2 (50g old starter to 100g of filtered water to 100g of flour) just before bed (11:00pm) and the starter will double in 8 hours (7:00am)- because you have provided twice the food. This approach has given me the flexibility to have starter ready- when I am! I also do all mixing in a kitchen aid mixer with dough hook and also do my bulk ferment/periodic stretch and fold in the same mixing bowl. I use a proofer for consistent temps during the 5-6 hr bulk ferment. I include wild rice (minerals) in my mix. Endless possibilities! Enjoy healthy sourdough!
I’m curious if a long fermented no-knead bread (still 12hrs + fermentation time, but using commercial yeast) would yield the same health benefits as a sourdough made with starter?
I’ve had a lot of failed sourdough loaves (though I haven’t given your recipe a try yet!) but much more success with no-knead.
There is some improvement in nutrition with commercial yeast, but nowhere close to a traditional sourdough. Some recipes combine sourdough starter with some commercial yeast, which could be a good option to get the best of both worlds while you’re getting used to perfecting sourdough.
Hi Lily,
I was wondering if you could provide what jar you use for your starter? I am having a hard time finding a straight edge mason jar with measurements on the side that is large enough to fit the restart feeding in. Thank you!!
It’s a 24 ounce wide mouth mason jar: https://amzn.to/419ioKA
Since your recipe is in volume measurements, how do you measure your flour? Scoop and level, or spoon into the cup and sweep off excess? I know different methods can yield very different amounts of flour. Going to try this method next week. Thanks!
I love your recipe and it’s worked well for me. I dont have a dutch oven. I’ve been trying the baking with a pan of water on the rack underneath the bread. Do you do that, to imitate the steam of the DO? Some of my loves have turned out gummy since trying this.
This bread is a game-changer for our family. I wanted to do better than spending $4/loaf on conventional sandwich bread. Now I can serve bread that’s way cheaper AND organic!
Also, it’s literally perfection for busy moms.
I keep telling my friends that sourdough is the perfect baking addiction for a toddler mom. You do something for 5 minutes, come back a while later, do something for another 5 minutes. Constant (joyful, of course) interruptions from my wee one kept me from baking for so long. Not anymore! Now I bake every week. Sourdough is my new superpower!
Awesome to hear, Serena. All of the fridge time on my method really make it easy to fit into the day(s). After 1 or 2 batches, all the steps become second nature.